Python接口自动化 | Request库详解和框架封装
Python接口自动化 | Request库详解和框架封装
- 一、目前软件测试的市场行情以及测试人员的能力标准
- 二、全面熟悉Requests库以及顶层方法调用逻辑
- 2.1 requests库
- 2.1 详解requests模块常用方法
- 2.3 requests模块中的response对象的属性和方法
- 三、requests接口自动化测试实战
- 3.1 接口关联必用的三种方式以及对应python库详解:
- 3.2 变量提取方式
- 3.2.1 正则提取
- 3.2.2 JsonPath提取
- 四、接口自动化框架封装
- 4.1 接口自动化统一请求封装
- 五、接口自动化测试框架封装之接口关联封装改进(python+pytest+yaml+allure+requests)
一、目前软件测试的市场行情以及测试人员的能力标准
从招聘需求我们不难看出目前市面上对软件测试人员的要求:
- 综合型的测试人才、侧重业务能力
- 代码能力(在自动化框架这一块有一定的建树)
- 开发思维(代码的封装能力)
而接口测试或者接口自动化是每一个面试环节都必问的,比如:
- 主流接口测试工具
- Postman+Newman+Jenkins持续集成接口自动化(基于Javascript语言)
- Jmeter+Ant+Jenkins持续集成接口自动化(基于Java语言)
- 接口自动化测试以及接口自动化平台测试(一般适用于中大型的项目或者公司)
- python+requests+pytest+yaml+allure+logging+jenkins接口自动化
既然我们有postman、jmeter、apifox等工具都可以实现接口测试,为什么我们还要封装框架或者是开发测试平台?工具的弊端如下:
- 敏捷开发接口数量巨大,如何实现团队合作和版本控制(如果是联网协助,安全问题?)
- 功能太死板,有些接口功能难以实现(比如:自定义加密、RSA加密、签名等)
- 当接口项目当中出现了多种协议的接口
- 没有办法生成美观的测试报告以及日志监控的实现
- 框架或平台可以自动以功能并推广到所有的项目中复用
二、全面熟悉Requests库以及顶层方法调用逻辑
2.1 requests库
requests库是用来发送HTTP请求,接受HTTP响应的Python第三方库,主要用于做接口自动化测试,使用前需要安装:
pip install requests
2.1 详解requests模块常用方法
def get(url, params=None, **kwargs): 发送get请求url:接口请求地址params:是get请求用于传参,这个参数会自动的以?的方式加到url之后,多个参数之间用&分割。**kwargs:可变长度字典参数def post(url, data=None, json=None, **kwargs): 发送post请求data:用于传参json: 用于传参files: 文件上传基于Postman:form-data: 既有表单参数也有文件上传 filesContent-Type:multipart/form-datax-www-form-urlencoded 表单          (data)Content-Type:application/x-www-form-urlencoded (data)raw: json(json),xml(data),text(data)Content-Type:application/json (json)Content-Type:text/plain (data)Content-Type:application/javascript (data)Content-Type:text/html (data)Content-Type:application/xml (data)binay:二进制文件上传(data)Content-Type:application/octrent-stream (data)def put(url, data=None, **kwargs):  发送put请求
def delete(url, **kwargs):          发送delete请求
------------------------------------------------------------------------requests模块下的:
def request(method, url, **kwargs):   发送任意请求,它是get、post、put、delete的底层方法------------------------------------------------------------------------def session():       获得一个session对象
session对象的:
def request(         session对象的request方法self,method,                    请求方式 get post put deleteurl,                       请求URL地址,接口文档标准的接口请求地址params=None,               params参数:请求数据中的链接,常见的一个get请求,请求参数都是放在url地址data=None,                 data参数:请求数据,参数为表单的数据格式json=None,                 json参数:接口常见的数据请求格式headers=None,              请求头:请求头信息 ,http请求中,编码方式等内容的添加cookies=None,              cookie信息:保存用户的登录信息。比如做一些充值功能,但是需要用户已经登录files=None,                文件上传-----------------------------------------------以上为常用参数-------------------auth=None,                 鉴权的意思,接口设置操作权限timeout=None,              超时处理allow_redirects=True,      重定向,请求不成功,再次请求(该功能并不是很常用)proxies=None,              设置代理hooks=None,                钩子stream=None,               文件下载功能,通过请求方式,下载文件,进行验证verify=None,               证书验证 1.要么请求忽略证书 2.要么加载证书地址cert=None,                 CA证书
):
reuests.request()和session.request()的区别在于:
前者的每一个请求都是独立的,后者会自动的关联所有的请求cookies信息(类似于jmeter中的http cookies管理器)
2.3 requests模块中的response对象的属性和方法
使用requests方法后会返回一个response对象,存储服务器的返回信息。response返回信息如下:
res = requests.get(url,params):res.text        返回字符串类型的数据,主要是文本
res.content     返回bytes字节类型数据,主要取照片和文件,中文显示为字符
res.json()      返回字典格式的数据
res.status_code 返回状态码
res.reason      返回状态信息
res.cookies     返回cookies信息
res.encoding    返回编码格式
res.headers     返回响应头信息
三、requests接口自动化测试实战
- get请求接口 get请求接口(需要关联接口)
- post请求接口(包括json传参和data传参)
- 文件上传接口
- 访问phpwind首页接口(正则表达式应用)
- 登录phpwind接口(包括:请求头、cookie鉴权、session鉴权)
import re
import time
import requestsclass TestApi:# 类变量access_token = ""csrf_token = ""session = requests.session()  # 创建会话对象# get请求接口def test_get_token(self):urls = "https://api.weixin.qq.com/cgi-bin/token"datas = {"grant_type": "client_credential","appid": "wx6b11b3efd1cdc290","secret": "106a9c6157c4db5f6029918738f9529d"}res = requests.get(url=urls, params=datas)result = res.json()TestApi.access_token = result["access_token"]print(result["access_token"])# 在第一个接口里面获取到access_token鉴权码# get请求接口(需要关联接口)def test_select_flag(self):urls = "https://api.weixin.qq.com/cgi-bin/tags/get"datas = {"access_token": TestApi.access_token}res = requests.get(url=urls, params=datas)print(res.json())# post请求接口(包括json传参和data传参)def test_edit_flag(self):urls = "https://api.weixin.qq.com/cgi-bin/tags/update"ps = {"access_token": TestApi.access_token}datas = {"tag": {"id": 7206, "name": "beibei" + str(int(time.time()))}}res = requests.post(url=urls, json=datas, params=ps)print(res.json())# 文件上传接口def test_file_upload(self):urls = "https://api.weixin.qq.com/cgi-bin/media/uploadimg?access_token=" + TestApi.access_tokendatas = {"media": open(r"E:\shu.png", "rb")}res = requests.post(url=urls, files=datas)print(res.json())# 访问phpwind首页接口(正则表达式应用)def test_phpwind(self):urls = "http://47.107.116.139/phpwind"res = TestApi.session.get(url=urls)result = res.textTestApi.csrf_token = re.search('name="csrf_token" value="(.*?)"', result).group(1)print(TestApi.csrf_token)# 登录接口(包括:请求头,cookie鉴权,seeion鉴权)def test_login(self):urls = "http://47.107.116.139/phpwind/index.php?m=u&c=login&a=dorun"datas = {"username": "fwj1151617715","password": "123456","csrf_token": TestApi.csrf_token,"backurl": "http://47.107.116.139/phpwind/","invite": ""}headers = {"Accept": "application/json, text/javascript, /; q=0.01","X-Requested-With": "XMLHttpRequest"}# res = request.post(url=urls,data=datas,headers=headers)res = TestApi.session.post(url=urls, data=datas, headers=headers)print(res.text)if __name__ == '__main__':TestApi().test_get_token()TestApi().test_select_flag()TestApi().test_edit_flag()TestApi().test_phpwind()TestApi().test_login()
3.1 接口关联必用的三种方式以及对应python库详解:
1、通过类变量保存中间变量实现接口关联 (上面代码使用到的就是类变量实现)
2、通过单独的文件保存中间变量实现接口关联
3、极限封装成零代码方式提取和使用接口关联
3.2 变量提取方式
3.2.1 正则提取
正则提取(正则表达式只能提取字符串的数据)
1、re.seach:只匹配一个值,通过下标[1]取值,没有匹配到放回None
2、re.findall:匹配多个值,返回列表list,多个值通过下标取值,,没有则返回None
token = re.search('"token":"(.*?)",',res.text)[1]
print("token1:%s",%token)token = re.findall('"token":"(.*?)",'res.text)
print("token2:%s",%token)
3.2.2 JsonPath提取
JsonPath提取(jsonpath只能够提取json格式的数据)
jsonpath.jsonpath,返回的是一个列表,通过下标取值,没有则返回None
四、接口自动化框架封装
目的:简化接口自动化的落地实施,统一化、标准化,企业期望达到:不懂代码的团队也能够通过框架实现接口自动化测试
4.1 接口自动化统一请求封装
为什么要封装统一接口请求?
- 去重重复的、冗余的代码
- 实现统一的异常处理和日志监控
封装代码如下:
#统一请求封装
import requestsclass RequestsUtil:"""使用requests底层代码进行封装"""# 创建请求会话,使其会话保持一致,会自动关联所有请求的cookies信息sess = requests.session()def send_all_request(self, **kwargs):#发送请求res = RequestsUtil.sess.request(**kwargs)return res
五、接口自动化测试框架封装之接口关联封装改进(python+pytest+yaml+allure+requests)
接口关联:创建一个extract.yaml文件存放关联数据,使用yaml文件写和读的操作进行接口关联
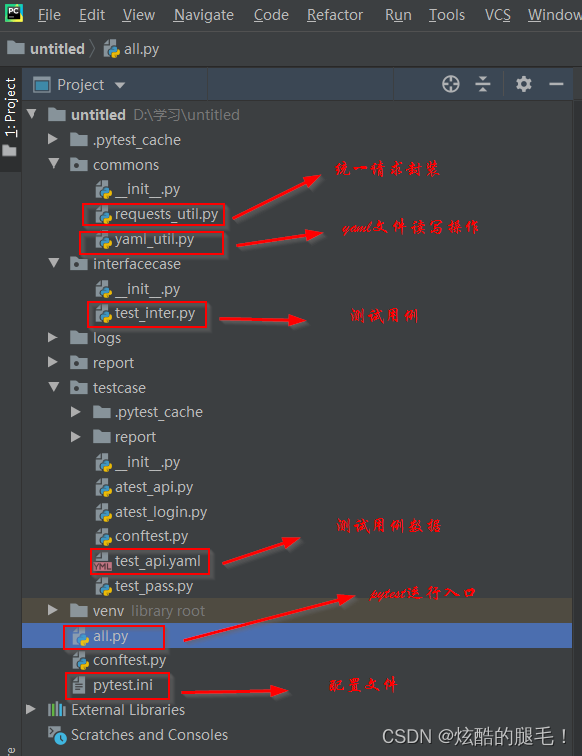
#commons--->yaml_util.py文件import requests
import yamlclass YamlApi:def __init__(self, yaml_file):"""通过init方法把yaml文件传入到这个类:param yaml_file: yaml文件路径"""self.yaml_file = yaml_filedef read_yaml(self):"""读取yaml,对yaml反序列化,就是把我们的yamk格式转成dict格式:return: 返回读取的字典格式的值"""with open(self.yaml_file, encoding="utf-8") as f:value = yaml.load(f, Loader=yaml.FullLoader)print(value)return valuedef write_yaml(self, data):""":param data: 要写入的数据:return:"""with open(self.yaml_file, encoding="utf-8", mode="a+") as f:yaml.dump(data, stream=f, allow_unicode=True)def clear_yaml(self):"""清空:return:"""with open(self.yaml_file, encoding="utf-8", mode="w") as f:f.truncate()if __name__ == '__main__':# YamlApi("../testcase/test_api.yaml").write_yaml("aaaa")YamlApi("../testcase/test_api.yaml").read_yaml()
#commons--> requests_util.py文件import requestsclass RequestsUtil:"""使用requests底层代码进行封装"""# 创建请求会话,使其会话保持一致,会自动关联所有请求的cookies信息sess = requests.session()def send_all_request(self, **kwargs):"""将get、post、put、delete请求进行封装:param kwargs::return: 返回请求对象"""res = RequestsUtil.sess.request(**kwargs)print(res.text)print(res.status_code)return res#interfacecase-->test_inter.py文件import pytest
from commons.requests_util import RequestsUtil
from commons.yaml_util import YamlApiclass TestApi:@pytest.mark.parametrize("caseinfo", YamlApi("./testcase/test_api.yaml").read_yaml())def test_get1_token(self, caseinfo):urls = caseinfo['request']['url']datas = caseinfo['request']['data']RequestsUtil().send_all_request(method="get", url=urls, data=datas)注意:这块的文件路径有一个坑,是以all.py文件为参照物来定义路径,所以路径是./testcase/test_api.yaml
#testcase-->test_api.yaml文件-name: 获取token鉴权码的接口request:method: geturl: https://api.weixin.qq.com/cgi-bin/tokendata:grant_type: client_credentialappid: wx74a8627810cfa308secret: e40a02f9d79a8097df497e6aaf93ab80vaildata: None# 全局下的pytest.ini文件[pytest]
#命令行参数,用空格分割
addopts = -vs
#测试用例文件夹,可自己配置
testpaths = ./
#配置测试搜索的模块文件名称
python_files = test_*.py
#配置测试搜索的测试类名
python_classes = Test*
#配置测试搜索的测试函数名
python_functions = test*
#加一个基础路径(测试环境)#标记
markers =smoke:冒烟用例usermanage:用户管理模块productmangage:商品管理模块
#全局下的all.py文件import pytestif __name__ == '__main__':pytest.main()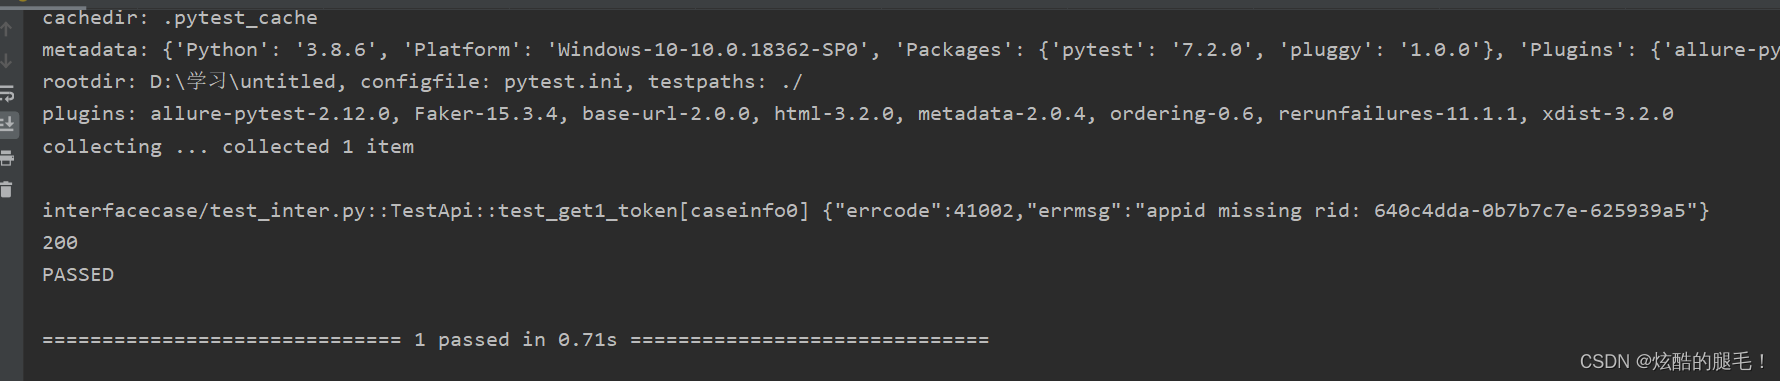
上一篇:Docker的基本操作
下一篇:设计模式-第18章(单例模式)