内嵌式Tomcat整合SSM框架
创始人
2025-05-31 02:11:16
0次
前言
笔者在学习的时候发现,为什么每次都要手动去配置Tomcat,我能不能不配啊?所以笔者参考了SpringBoot框架的开发思想,想到了使用内嵌式Tomcat,经过笔者查询大量的资料,最终实现了,那么我们接下来就一起看看怎么实现!
技术栈
JDK17
Apache-tomcat-10.1.6
Spring-6.0.0
SpringMVC-6.0.0
MyBatis-3.5.6
MySQL Driver-8.0.27
本项目源码:https://gitee.com/mumangguo/embed-tomcat-ssm,有需要的自取!
具体实现
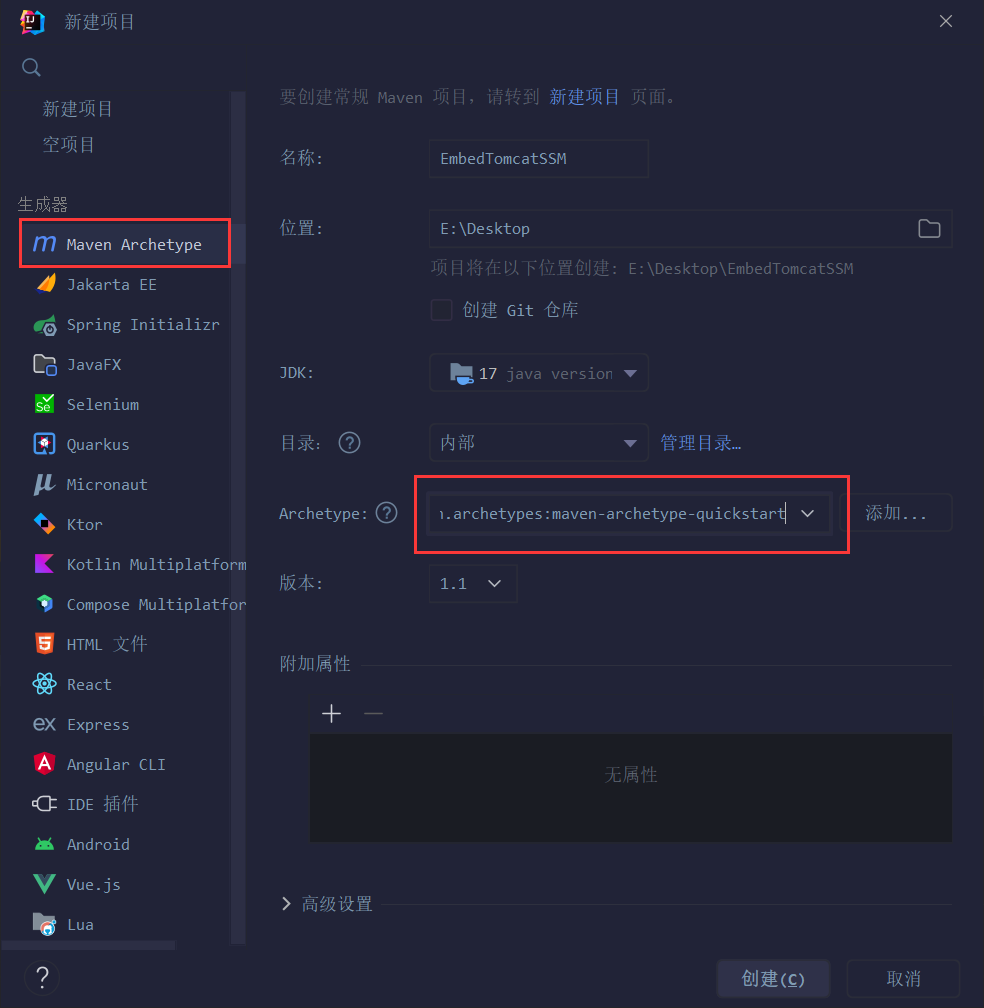
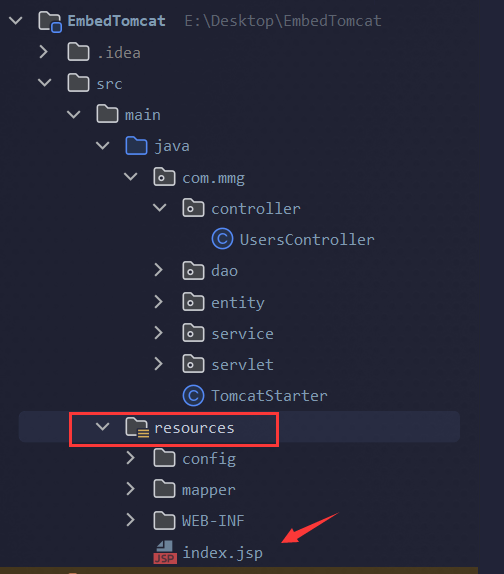
创建普通Maven工程,不需要创建Maven的Web工程
引入相关依赖,并在properties标签中指定公共版本号
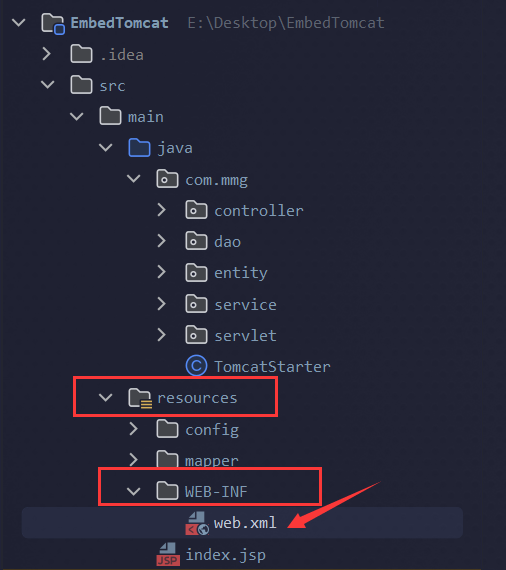
6.0.0 10.1.6 org.apache.tomcat.embed tomcat-embed-core ${embed.tomcat.version} org.apache.tomcat.embed tomcat-embed-jasper ${embed.tomcat.version} junit junit 3.8.1 test org.springframework spring-core ${spring.version} org.springframework spring-beans ${spring.version} org.springframework spring-aop ${spring.version} org.springframework spring-context ${spring.version} org.springframework spring-context-support ${spring.version} org.springframework spring-jdbc ${spring.version} org.springframework spring-web ${spring.version} org.springframework spring-webmvc ${spring.version} com.alibaba druid 1.1.12 mysql mysql-connector-java 8.0.27 org.mybatis mybatis 3.5.6 org.mybatis mybatis-spring 3.0.1 com.fasterxml.jackson.core jackson-databind 2.9.3 org.aspectj aspectjweaver 1.9.5 org.aspectj aspectjrt 1.9.5 在resources目录下新建一个名为WEB-INF的目录,在此目录下创建一个web.xml文件,并写入以下内容
目录结构:
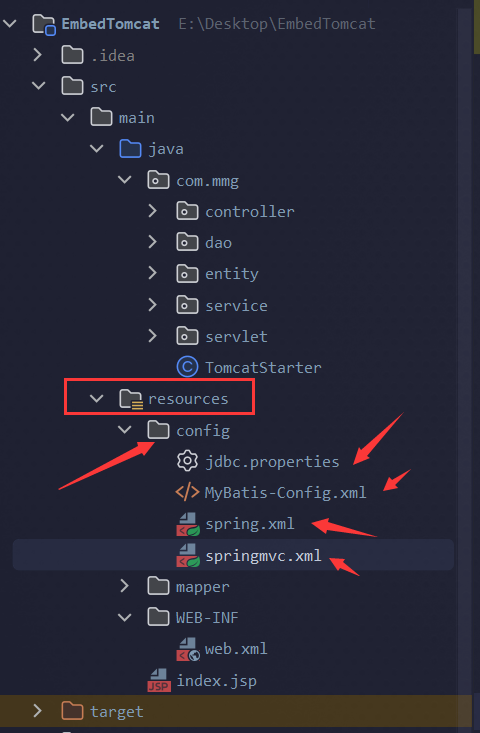
Archetype Created Web Application contextConfigLocation classpath:config/spring.xml org.springframework.web.context.ContextLoaderListener springmvc org.springframework.web.servlet.DispatcherServlet contextConfigLocation classpath:config/springmvc.xml springmvc / 在resouces目录下新建一个config目录用来管理spring相关配置文件,具体内容如下
目录结构:
jdbc.properties
jdbc.driverClassName=com.mysql.cj.jdbc.Driver
jdbc.url=jdbc:mysql://localhost:3306/ssm
jdbc.username=root
jdbc.password=admin
MyBatis-Config.xml
spring.xml
springmvc.xml
编写Tomcat启动类
package com.mmg;import org.apache.catalina.Context;
import org.apache.catalina.WebResourceRoot;
import org.apache.catalina.startup.Tomcat;
import org.apache.catalina.webresources.DirResourceSet;
import org.apache.catalina.webresources.StandardRoot;import java.io.File;/*** 通过TomcatStarter启动该项目即可* @author mmg*/
public class TomcatStarter {public static void main(String[] args) throws Exception {// 启动 tomcatTomcat tomcat = new Tomcat();tomcat.setPort(Integer.getInteger("port", 8080));tomcat.getConnector();// 创建 WebAppContext context = tomcat.addWebapp("", new File("src/main/resources").getAbsolutePath());WebResourceRoot resources = new StandardRoot(context);resources.addPreResources(new DirResourceSet(resources, "/WEB-INF/classes",new File("target/classes").getAbsolutePath(), "/"));context.setResources(resources);tomcat.start();tomcat.getServer().await();}
}
编写实体类,包名为com.mmg.entity,文件名为Users
package com.mmg.entity;/*** 实体类*/
public class Users {private Integer id;private String username;private String birthday;private Integer sex;private String address;public Users() {}public Users(String username, String birthday, Integer sex, String address) {this.username = username;this.birthday = birthday;this.sex = sex;this.address = address;}public Users(Integer id, String username, String birthday, Integer sex, String address) {this.id = id;this.username = username;this.birthday = birthday;this.sex = sex;this.address = address;}public Integer getId() {return id;}public void setId(Integer id) {this.id = id;}public String getUsername() {return username;}public void setUsername(String username) {this.username = username;}public String getBirthday() {return birthday;}public void setBirthday(String birthday) {this.birthday = birthday;}public Integer getSex() {return sex;}public void setSex(Integer sex) {this.sex = sex;}public String getAddress() {return address;}public void setAddress(String address) {this.address = address;}@Overridepublic String toString() {return "Users{" +"id=" + id +", username='" + username + '\'' +", birthday='" + birthday + '\'' +", sex=" + sex +", address='" + address + '\'' +'}';}
}
编写dao层,包名为com.mmg.dao,文件名为UsersDao
package com.mmg.dao;import com.mmg.entity.Users;
import org.apache.ibatis.annotations.Param;import java.util.List;public interface UsersDao {/*** 分页查询*/List selectByPage(@Param("page") Integer page, @Param("pageSize") Integer pageSize);/*** 根据id查询*/Users selectById(Integer id);/*** 查询所有用户*/List selectAll();/*** 新增*/int insert(Users users);/*** 删除*/int delete(Integer id);/*** 更新*/int update(Users user);
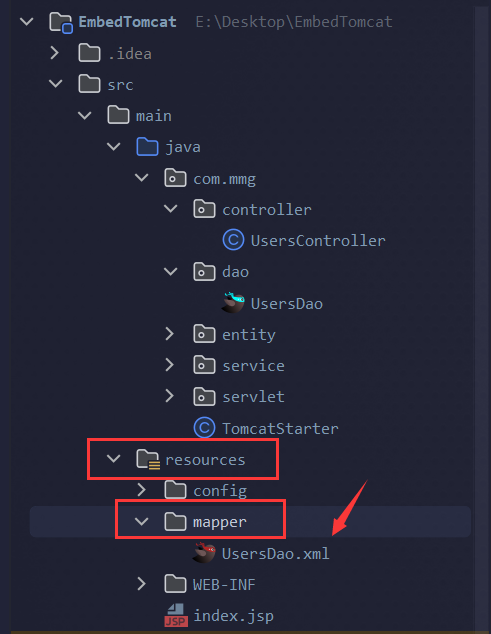
} 编写mapper映射文件,在resources目录下新建mapper目录,用来存放mapper映射
目录结构:
insert into users values (null,#{username},#{birthday},#{sex},#{address}) update t_user set username=#{username},birthday=#{birthday},sex=#{sex},address=#{address} where id=#{id} delete from users where id=#{id}
编写service层和service实现层,包名为com.mmg.service和com.mmg.service.impl
UsersService.java
package com.mmg.service;import com.mmg.entity.Users;import java.util.List;public interface UsersService {/*** 分页查询*/List selectByPage(Integer page, Integer pageSize);/*** 根据id查询*/Users selectById(Integer id);/*** 查询所有用户*/List selectAll();/*** 新增*/int insert(Users users);/*** 删除*/int delete(Integer id);/*** 更新*/int update(Users users);
}
UsersServiceImpl.java
package com.mmg.service.impl;import com.mmg.dao.UsersDao;
import com.mmg.entity.Users;
import com.mmg.service.UsersService;
import org.apache.catalina.User;
import org.springframework.beans.factory.annotation.Autowired;
import org.springframework.stereotype.Service;
import org.springframework.transaction.annotation.Transactional;import java.util.List;@Transactional //开启事务
@Service //将UsersServiceImpl交给Spring管理,默认类名首字母小写
public class UsersServiceImpl implements UsersService {private UsersDao usersDao;//使用构造注入@Autowiredpublic UsersServiceImpl(UsersDao usersDao) {this.usersDao = usersDao;}@Overridepublic List selectByPage(Integer page, Integer pageSize) {page = (page - 1) * pageSize;return usersDao.selectByPage(page, pageSize);}@Overridepublic Users selectById(Integer id) {return usersDao.selectById(id);}public List selectAll() {return usersDao.selectAll();}public int insert(Users users) {return usersDao.insert(users);}@Overridepublic int delete(Integer id) {return usersDao.delete(id);}@Overridepublic int update(Users users) {return usersDao.update(users);}
}
编写Controller层,包名为com.mmg.controller
package com.mmg.controller;import com.mmg.entity.Users;
import com.mmg.service.UsersService;
import jakarta.annotation.Resource;
import org.springframework.beans.factory.annotation.Autowired;
import org.springframework.web.bind.annotation.*;import java.util.List;@RestController //代表类中返回值转换为json响应到浏览器
@RequestMapping("/users") //代表访问路径,通过/users访问
public class UsersController {@Resourceprivate UsersService usersService;/***  API=http://localhost:8080/users/{page}/{pageSize}*/@GetMapping("/{page}/{pageSize}")public List getUsersByPage(@PathVariable("page") Integer page, @PathVariable("pageSize") Integer pageSize) {return usersService.selectByPage(page, pageSize);}/*** API=http://localhost:8080/users/{id}*/@GetMapping("/{id}")public Users getUsersById(@PathVariable("id") Integer id) {return usersService.selectById(id);}/*** API=http://localhost:8080/users* 参数:无*/@GetMapping("") //get请求的访问路径public List getAllUsers() {return usersService.selectAll();}/*** API=http://localhost:8080/users/add* 参数:* {* "username": "木芒果",* "birthday": "2003-12-22",* "sex": 2,* "address": "湖南"* }*/@PostMapping("/add") //post请求的访问路径public String addUsers(@RequestBody Users users) {int count = usersService.insert(users);if (count == 1) {return "success";}return "fail";}/*** API=http://localhost:8080/users/{id}*/@DeleteMapping("/{id}") //delete请求的访问路径public String deleteUsers(@PathVariable("id") Integer id) {int count = usersService.delete(id);if (count == 1) {return "success";}return "fail";}/*** API=http://localhost:8080/users* 参数:* {* "username": "木芒果",* "birthday": "2003-12-22",* "sex": 2,* "address": "湖南"*/@PutMapping("") //put请求的访问路径public String updateUsers(@RequestBody Users users) {int count = usersService.update(users);if (count == 1) {return "success";}return "fail";}
}
在resources目录下新建一个index.jsp供显示
目录结构:
<%@ page contentType="text/html;charset=UTF-8" language="java" %>
到此代码全部写完,我们通过启动TomcatStarter类完成项目的启动!
总结
总体来说还是比较简单的,主要用到了Tomcat底层相关知识
如果你有更好的想法可以评论在下方哦!笔者水平有限...
如果不想看长篇的教程,可以直接拉取本项目自行查询
相关内容
热门资讯
linux入门---制作进度条
了解缓冲区 我们首先来看看下面的操作: 我们首先创建了一个文件并在这个文件里面添加了...
C++ 机房预约系统(六):学...
8、 学生模块 8.1 学生子菜单、登录和注销 实现步骤: 在Student.cpp的...
JAVA多线程知识整理
Java多线程基础 线程的创建和启动 继承Thread类来创建并启动 自定义Thread类的子类&#...
【洛谷 P1090】[NOIP...
[NOIP2004 提高组] 合并果子 / [USACO06NOV] Fence Repair G ...
国民技术LPUART介绍
低功耗通用异步接收器(LPUART) 简介 低功耗通用异步收发器...
城乡供水一体化平台-助力乡村振...
城乡供水一体化管理系统建设方案 城乡供水一体化管理系统是运用云计算、大数据等信息化手段...
程序的循环结构和random库...
第三个参数就是步长 引入文件时记得指明字符格式,否则读入不了 ...
中国版ChatGPT在哪些方面...
目录 一、中国巨大的市场需求 二、中国企业加速创新 三、中国的人工智能发展 四、企业愿景的推进 五、...
报名开启 | 共赴一场 Flu...
2023 年 1 月 25 日,Flutter Forward 大会在肯尼亚首都内罗毕...
汇编00-MASM 和 Vis...
Qt源码解析 索引 汇编逆向--- MASM 和 Visual Studio入门 前提知识ÿ...
【简陋Web应用3】实现人脸比...
文章目录🍉 前情提要🌷 效果演示🥝 实现过程1. u...
前缀和与对数器与二分法
1. 前缀和 假设有一个数组,我们想大量频繁的去访问L到R这个区间的和,...
windows安装JDK步骤
一、 下载JDK安装包 下载地址:https://www.oracle.com/jav...
分治法实现合并排序(归并排序)...
🎊【数据结构与算法】专题正在持续更新中,各种数据结构的创建原理与运用✨...
在linux上安装配置node...
目录前言1,关于nodejs2,配置环境变量3,总结 前言...
Linux学习之端口、网络协议...
端口:设备与外界通讯交流的出口 网络协议: 网络协议是指计算机通信网...
Linux内核进程管理并发同步...
并发同步并发 是指在某一时间段内能够处理多个任务的能力,而 并行 是指同一时间能够处理...
opencv学习-HOG LO...
目录1. HOG(Histogram of Oriented Gradients,方向梯度直方图)1...
EEG微状态的功能意义
导读大脑的瞬时全局功能状态反映在其电场结构上。聚类分析方法一致地提取了四种头表面脑电场结构ÿ...
【Unity 手写PBR】Bu...
写在前面 前期积累: GAMES101作业7提高-实现微表面模型你需要了解的知识 【技...